- Open SERVER MANAGER. On Dashboard click on "Add roles and features".
- Add Roles and Features Wizard will open up. Click Next on "Before you Begin" page.
- On "Installation type" page select "Role-based or feature-based installation" and click next.
- Select your Server on "Server Selection" page and click next.
- On "Server Roles" page select "Active Directory Domain Services" and you will see a pop-up to add features as below.

- Click on "Add features" and click next.
- Next on "Features" page no changes required, click next.
- And on "AD DS" page also no changes required and click next.
- Finally we get to the confirmation page. Click on "Install".
- Once installation is complete, close and come back to Server Manager. Now you will see an yellow triangle with exclamation mark on top of server manager as shown below. Click on that.

- Now click on "Promote this server to domain controller". "Active Directory Domain Services Wizard" will pop-up.
- We are going to create a new forest. Select "Add a new forest". The Domain has to be something like "<name>.internal".

On "Domain Controller Options" page enter password and click Next. No other changes required.

- On DNS Options page, nothing to change. Click next.
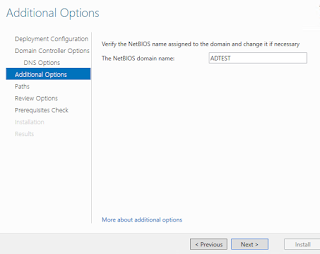
- On Additional Options page, The NetBios Domain Name will automatically fillup. No need to change anything. Just click next.
- No need to change anything on "Paths" page and "Review Options" page. Just click Next on both pages.
- On "Prerequisites Check" page, the pre-requisites will run and will show as successful.If you are using Hyper-V to create this Domain Controller, you might see the error (Verification of prerequisites for Domain Controller promotion failed. The TCP/IP networking protocol must be properly configured). Then follow below steps in step 18.
- This step is required only if you got the error mentioned in Step 17. Go to Hyper-V Manager. Click on "Virtual Switch Manager". Select "internal". Click on "Create Virtual Switch". Enter "Name" and click apply and ok. Now go to Hyper-V VM you are using for Domain Controller. Click on "Settings". Go to "Network Adapter". Select the Virtual Switch you created from the dropdown. Click apply and ok. Now Restart the VM. Then Re-do all the steps from Step-10 again.
- Click on install. Server will restart once installation is complete. While logging in, you have to login with Domain\Administrator and password.
- To verify installation go to Server Manager. Then go to "Tools". Click on "Active Directory Users and Computers".
- You will see your Domainroot. In my case it will show as "ADTEST.internal". Expand that and you will see "Domain Controller" and click on it. Then you will see your server.
- Go to Server Manager again and click on "Local Server". We have to enable remote desktop connection now. Click on "Disabled".
- Select "Allow remote connections to this computer". Unselect "Allow connections only from computers running Remote Desktop with Network Level Authentication". Click Apply and Ok.
Active Directory Setup on Windows Server 2016
Steps for setting up Active Directory on Windows Server 2016 and promote the server as a domain controller


Subscribe to:
Comments (Atom)
No comments:
Post a Comment